Setting up infrastructure should be as simple as playing with LEGO. With the advent of Docker, IT has underwent a dramatic change. For instance, it became easy to setup throw-away development environments. These could then be used to create clean environments to perform builds in. And eventually, containers are starting to move into the general infrastructure . This is a transaction that is currently still happening, helped by tools as Docker Swarm and Kubernetes. In this short article I will show how these ideas can help in setting up a composable infrastructure, providing you with a powerful IDE in the cloud, full with Let's Encrypt certificate generation.
Cloud9
We will be deploying C9, or Cloud9 IDE, is a full IDE which can be accessed from your browser. For convenience of use, I created a containerized version of this some while back and have ever since been using it. Although,, C9 also has a hosted environment, I grew worried after Amazon acquired the company. Support has since been slower to respond and this made me look into other ways to provide an alternative approach. After some testing with Docker Cloud it seemed like a good idea to deploy a self-hosted alternative.
But first about one of the main components. The container I created exposes port 8181, which is an unsecured endpoint. It allows you to simply setup a local instance with:
$ alias c9ide='docker run -it --rm -v $PWD:/workspace gbraad/c9ide:u1604'
$ cd ~/Projects/gauth
$ c9ide
This would however work for a local environment and does not provide a secure solution. More was needed... such as secure solution and preferably automated. For this Nginx and Let's Encrypt is used. More information about Cloud9 can be found in my Knowledge Base article*.
Preparation
To deploy the environment I used Fedora 24. Most cloud providers provide this as an image. In my case, CityCloud provided the latest version after placing a simple request. You can consider any size, but the more storage and memory, the better the performance will be. I set up a 4G and 2 cores instance, with 50G of storage. After logging in, perform the following commands
$ sudo su -
$ dnf update -y
$ dnf install -y docker
$ setenforce 0
$ sed 's/SELINUX=targeted/SELINUX=permisssive/g' /etc/selinux/config
$ systemctl enable docker
$ systemctl start docker
Note: SELinux is disabled because we will have a volume attached to the IDE container where the workspace will be located. We can however fix this, but this is something for a future blog post.
Setup DNS
After this, you host machine should be ready to host containers to will make up our environment. before we continue, we need to be sure we have DNS configured that can point to the running containers that host the C9 IDE. I used CloudFlare and setup the following wildcard for my environment.

With this each hostname, such as ubuntu.c9ide.spotsnel.net would point to the same machine that hosts our development containers.
Deploy Nginx
To allow a hostname to be resolved to a 'local' end-point a reverse proxy is needed. Jason Wilder created a container for this purpose called nginx-proxy. It needs access to the docker.sock to be notified of changes and it will accordingly create an endpoint in the hosted Nginx. For more information about this, please read nginx-proxy's description on Docker hub.
# docker run -d -p 80:80 -p 443:443 \
   --name nginx-proxy \
   -v /path/to/certs:/etc/nginx/certs:ro \
   -v /etc/nginx/vhost.d \
   -v /usr/share/nginx/html \
   -v /var/run/docker.sock:/tmp/docker.sock:ro \
   jwilder/nginx-proxy
Opening any address pointing to this host would know result in a 503 error. This means that Nginx is listening and can not forward the request. We will deal with this later.
Deploy Let's Encrypt companion
Setting up a secure connection involves certificates which can be quite a hassle to obtain, and if trust of security is concerned, even very expensive. Luckily, initiatives exist that believe security should be available to all and Let's Encrypt provides a fully automated solution. Using the letsencrypt-nginx-proxy-companion container created by Yves Blusseau, it is possible allow the proxy container to be provisioned with the needed certificates. More information about this container can be found at Docker hub.
# docker run -d \
   --name nginx-proxy-letsencrypt \
   -v /path/to/certs:/etc/nginx/certs:rw \
   --volumes-from nginx-proxy \
   -v /var/run/docker.sock:/var/run/docker.sock:ro \
   jrcs/letsencrypt-nginx-proxy-companion
Unfortunately we do not have a way to really test this. But if the container starts correctly and does not terminate, it is likely working correctly, waiting for notifications of newly created containers.
Explanation
Containers that provide metadata in the form of environment variables, indicate to these service containers what the endpoint will be.
The nginx-proxy service uses VIRTUAL_HOST to know what the hostname endpoint will be. While the Let's Encrypt companion service uses LETSENCRYPT_HOST for this. In the rest of this article the endpoints will be the same. With LETSENCRYPT_EMAIL we indicate to who the certificate will be addressed.
C9 IDE
The container hosting C9 is available in different flavors. I have created them based on CentOS 7, Fedora 24 and Ubuntu Xenail (16.04). To prepare, it is a good idea to pull the images locally:
# docker pull gbraad/c9ide:c7
# docker pull gbraad/c9ide:f24
# docker pull gbraad/c9ide:u1604
To setup the containers as endpoints, I created the following helper script. It will deal with setting up the host and email for login to the container.
./create.sh [name] [host] [email] [password] [flavor] [volume]
1 2 3 4 5 6 7 8 9 10 11 12 13 14 15 16 17 18 19 20 | #!/bin/sh -x
set -e
NAME=${1:-"test"}
HOST=${2:-${NAME}".local"}
USER=${3:-"nobody@local"}
PASS=${4:-"secrete"}
FLAVOR=${5:-"u1604"} # c7, f24, u1604
VOLUME=${6:-"/workspaces/c9ide-"${NAME}}
mkdir -p ${VOLUME}
docker run -d \
--name ${NAME} \
-v ${VOLUME}:/workspace:rw \
-e "VIRTUAL_HOST=${HOST}" \
-e "LETSENCRYPT_HOST=${HOST}" \
-e "LETSENCRYPT_EMAIL=${USER}" \
-e "USERNAME=${USER}" \
-e "PASSWORD=${PASS}" \
gbraad/c9ide:${FLAVOR}
|
The USERNAME and PASSWORD are used to perform basic authentication. As you can see, the email address used for the certificates is also used for the username for login. This can of course customized.
After this,
# chmod +x create.sh
# mkdir /workspaces
# ./create.sh ubuntu ubuntu.c9ide.spotsnel.net [email protected] verysecrete
# ./create.sh centos quentin.c9ide.spotsnel.net [email protected] verysecrete c7
will create two containers, hosted at ubuntu.c9ide.spotsnel.net and quentin.c9ide.spotsnel.net. Notice that I used /workspaces to provide the storage location for all the host containers. Make sure this is hosted on a separate mountpoint for instance.
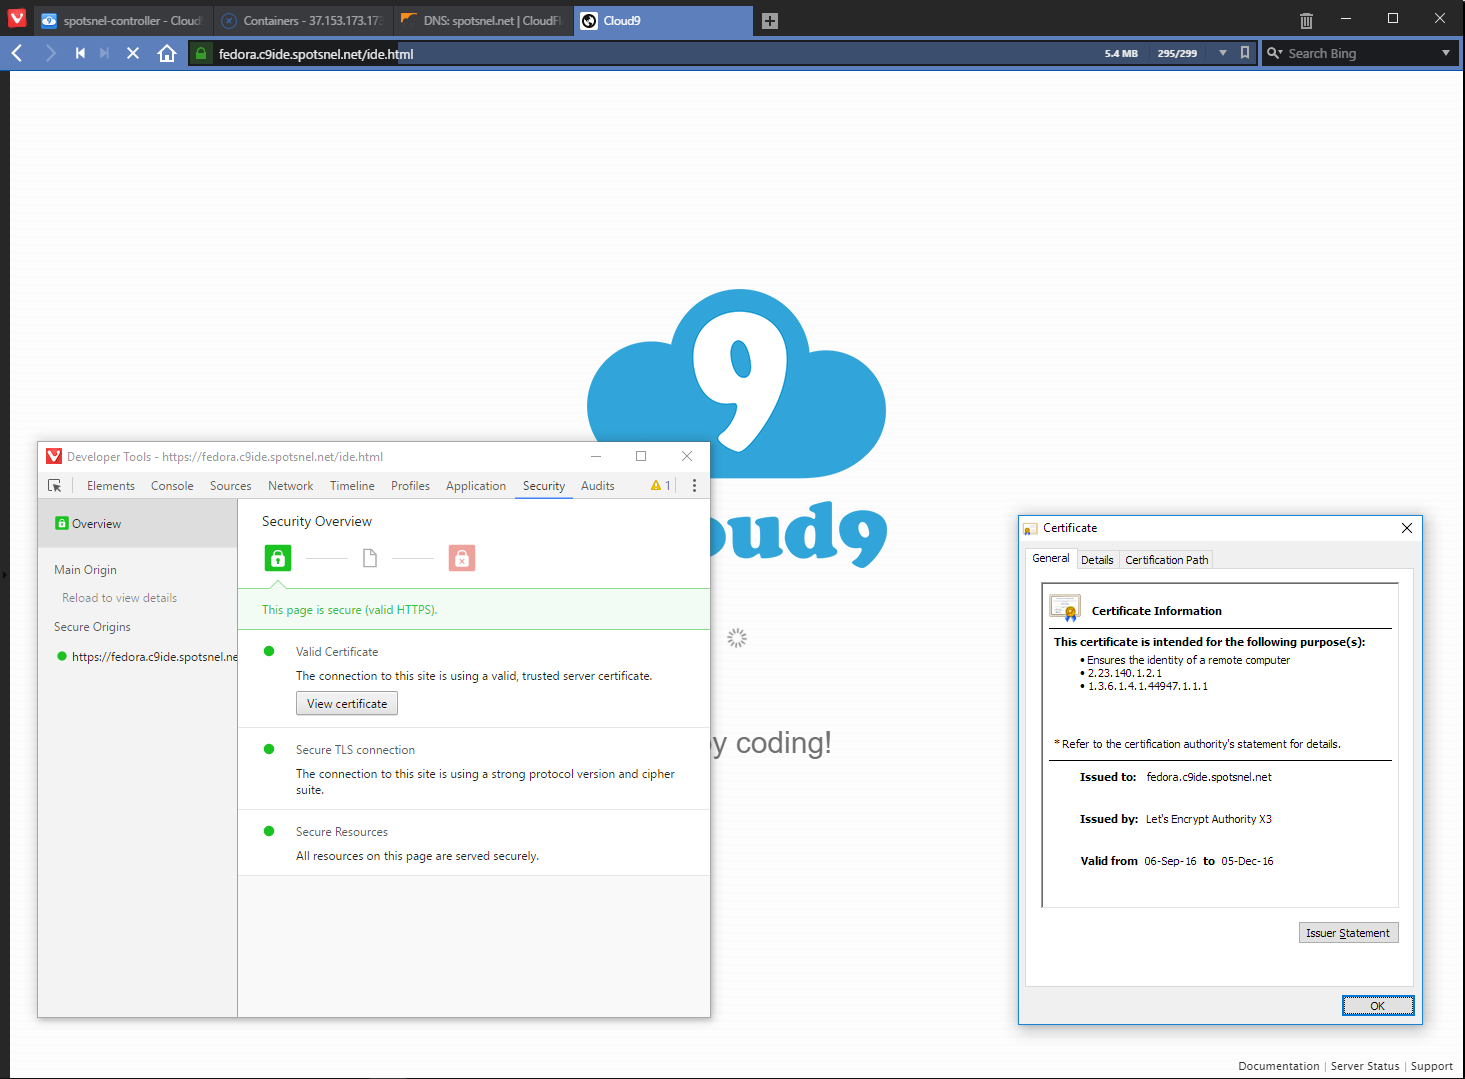
Now open your IDE by opening https://ubuntu.c9ide.spotsnel.net in your browser. If all goes well, you will be created by a login prompt. The username is [email protected] and the password verysecrete.
In future articles I will detail more about the composability of infrastructure. if you enjoyed this article, consider tweeting about it. If you have comments, please find me online at @gbraad.
Comments
comments powered by Disqus